The construction Industry uses a wide range of materials such as timber and other wood products, adhesives, hardware items, glass, plastics and surface finishes to name just a few.
In this chapter we will talk about:
The main construction materials used in the construction Industry are wood products. You will need to understand the characteristics of these materials so you can work with them successfully.
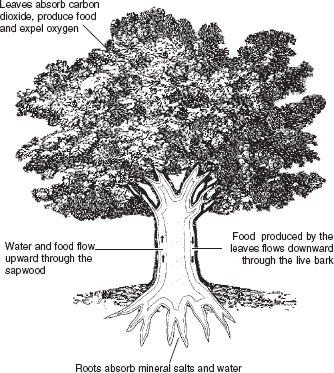
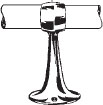
Trees are the natural resource from which all wood products are made. The illustration below shows how the tree gets the food and water necessary for its growth.
The roots extract mineral salts and water from the soil and the leaves produce sugars from carbon dioxide and water by a process called photosynthesis.
This process can only occur in the presence of sunlight and chlorophyll (the green substance in leaves).
Leaves absorb carbon dioxide, produce food and expel oxygen Water and food flow upward through the sapwood
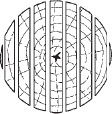
The illustration below shows the parts of a tree trunk.
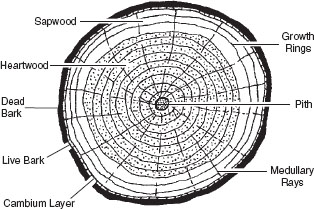
Dead bark or outer bark protects the trunk and helps to reduce water loss from the living cells of the tree.
Live bark is a layer of living tissue under the dead bark which conducts food from the leaves to the other parts of the tree.
Cambium layer is a thin layer of cells inside the live bark, which is responsible for all growth in the thickness of the tree trunk. The cambium grows wood cells on the inside and live bark cells on the outside.
Sapwood is the new wood under the cambium layer. It is usually lighter in colour than heartwood and it conducts water and food materials from the root system to the other parts of the tree.
Heartwood or truewood is made up of dead cells. It is much more durable than sapwood and is formed by blockage of the channels which conduct food materials when stored food is converted into tannins, resins and other substances.
Pith is the soft, pulpy core at the centre of the tree. It is sometimes called the medulla and is usually about one centimetre in diameter.
Medullary rays are groups of wood cells which radiate out from the pith (medulla) through the heartwood and sapwood zones of the tree. Food materials are conducted horizontally in the trunk of the tree through the medullary rays.
Growth rings show the annual growth in the trunk of the tree. As growth slows down in the winter compared to the growing season, the layers of wood cells (late wood) are smaller and more closely packed, forming a ring which is darker in colour than wood grown at a faster rate (early wood). The age of the tree can be determined by counting the number of growth rings.
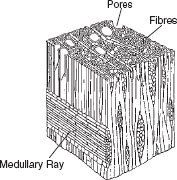
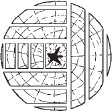
The illustrations on the next page represent small blocks of wood about 1mm high. In botany the terms softwood and hardwood refer to the structure of wood cells, not hardness or softness of the wood. In the botanical sense, trees which have needle-like foliage, such as pines and other conifers, are usually classified as softwoods, while broad leafed trees are usually classified as hardwoods.
Hardwoods contain large tube-like vessels called pores which conduct much of the water and food materials. The smaller, thick walled cells shown in the diagram are wood fibres which make up most of the wood substance.
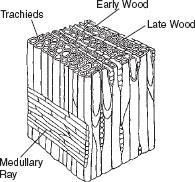
Softwoods are made up of long thin cells or trachieds which are much smaller than the pores in hardwood. The walls of the trachieds make up most of the wood substance.
Before leaving this page, think of what you've just been reading, and test yourself with these questions.
[[ so /f ][ Place these layers of a tree in order from outside to inside: ][ Dead bark ][ Live bark ][ Cambum layer ][ Sapwood ][ Heartwood ][ Pith ][ Dead bark => Live bark => Cambum layer => Sapwood => Heartwood => Pith. ]]
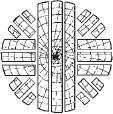
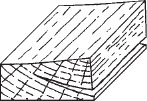
Logs are usually sawn into commercial sized timber soon after the tree has been felled, to minimise damage from shrinkage such as splitting at the ends of the log.
The illustrations below show different methods of converting a log into commercial timber. The method used will depend on the type of timber and its end use.
Live sawing is the simplest method of cutting logs into boards. Parallel cuts produce wide boards, some of which can be prone to excessive warping and uneven shrinkage. Some live sawn boards could be classified as back sawn or quarter sawn.
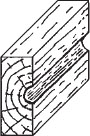
Back sawing produces boards with faces generally tangential to the growth rings. This method allows for sawing around defects in the log with little waste. Cabinet timbers with distinctive growth rings are often back sawn to give the best figure on the face of the board. Trade practice is to class timber as back sawn when the average inclination of the growth rings to the face of the board is less than 45°.
Quarter sawing produces boards with faces roughly parallel to the medullary rays and at right angles to the growth rings. Timbers with pronounced medullary rays, such as silky oak, have a distinctive figure when quarter sawn. Quarter sawing is the least economical method because more timber is lost in waste. Boards are classed as quarter sawn when the average inclination of the growth rings to the face is greater than 45°.
When you select timber for a furniture project, you should inspect each piece for defects. A defect in timber is anything that affects its normal appearance, durability or strength. The presence of a defect doesn’t always mean that the timber can’t be used in your project.
If the defect doesn’t weaken it too much the timber could be used where the defect will not be visible in the finished article. For example, a piece to be used for a drawer front may have a small defect on one face only. The drawer could be constructed with the defect to the inside so the visible face will be blemish free.
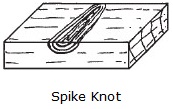
Knots are branches embedded in the tree and cut through in the milling process. They tend to weaken the timber and spoil the appearance of some cabinet timbers. Knots can shrink, become loose and may even fall out.

The ordinary knot (roughly circular in shape) is formed when the cut is made across the embedded branch and the spike knot is formed when the cut is made in the same direction as the embedded branch.
Shakes are caused by layers of wood separating between the growth rings or along the medullary rays. Layers sometimes separate when uneven shrinkage occurs in the heartwood while the tree is still standing. It might be possible to cut the board down to remove the defect and salvage some of the timber.
A pipe or cylindrical hole forms when the wood around the pith decays. A piece of timber with a small pipe might still be used if the pipe was not visible in the finished article and did not severely weaken the timber or cause excessive warping.
Gum veins are cavities which contain resin substances or gum. Gum veins can occur naturally in the wood or they can be caused by an injury to the tree.

Gum veins disfigure and sometimes weaken timber. In some timbers, the substances found in gum veins will ‘bleed’ through paint or clear wood finishes. You should always consider this when selecting timber for a project.
Moisture content affects the stability of timber. If moisture content increases, timber swells. If moisture content decreases, timber shrinks. This is called ‘movement’ in timber. Timber that is used in a furniture project should be subject to minimum movement. In other words, the timber should be properly seasoned.
Seasoning is the process of drying out most of the water from the cell walls and cell cavities of the wood.
Air seasoning is a natural drying method in which green sawn timber is placed in well ventilated stacks out in the open. Air seasoning could take two or more years depending on the type and thickness of the timber.
Kiln seasoning is an artificial drying method which could take a few days or a few weeks, depending on the type and thickness of the timber. The timber is placed in large drying rooms called kilns and stacked so that air can circulate around the boards. Humidity and temperature are controlled in the kilns during the seasoning process.
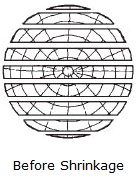
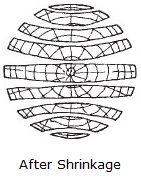
Shrinkage occurs in the seasoning process as the water dries out of the wood. Wood fibres become smaller causing dimensional change in the boards being seasoned.
Very little shrinkage occurs in the length of the board. Most shrinkage occurs in the direction of the growth rings which tend to straighten out causing ‘cupping’ of the board. The illustrations on the right show the effect of shrinkage on sawn timber.
Selected timber for furniture making should be properly seasoned and allowed to stabilise in the local atmospheric conditions. Timber tends to reach a moisture content that is in equilibrium with the moisture content of the surrounding air over a period of time.
Equilibrium Moisture Content (EMC) is usually within the range of 10%-15% of the dry weight of the wood, except in very dry inland areas or tropical coastal districts. Using timber that is properly seasoned and stabilised in the local conditions for at least a few weeks, will minimise movement (swelling and shrinking).
Movement in cabinet timbers can cause problems such as joints opening up, drawers and doors binding and solid timber panels splitting or warping.
Timbers could be selected for their colour and figure or their working and finishing characteristics. Figure is the pattern in the timber caused by variations in colour, grain and texture. Grain refers to the general direction of the wood fibres in the board. Texture refers to the arrangement and size of the cells in the wood structure and is described as coarse, medium or fine.
The tables which follow list some of the commonly used local and imported timbers.
Before leaving this page, think of what you've just been reading, and test yourself with these questions.
[[ mc /f ][ Which method of sawing usually produces boards that have faces that are tangential to the growth rings? ][ * Live sawing. ][ Back Sawing. ][ * Quarter sawing. ][ Back sawing produces boards with faces that align with the growth rings of the tree. ]]
[[ mm /f ][ Match the timber defect to its description: ][ Knots ~ Branches embedded in the tree and cut through. ][ Shakes ~ Separations between the growth rings or along the rays. ][ Pipes ~ Formed when the wood around the pith decays. ][ Veins ~ Cavities which contain resin substances or gum. ][ Knots are branches embedded in the tree; Shakes are separations between the rings, etc; Pipes are formed when wood decays; Veins are cavities which contain resin or gum. ]]
[[ mr /f ][ What processes assist in preparing timber for use in different climates and environments? ][ Seasoning (drying) of timber. ][ Stabilising in local atmospheric conditions. ][ * Using waterproof glues. ][ * Sealing with paints and lacquers. ][ * Stretching of timbers. ][ Sealing and stretching aren't used to prepare timber; using waterproof glue isn't relevant. ]]
The illustrations below show a selection of common nail type fasteners used in the construction Industry and other woodworking trades.
Bullet head nails are general purpose nails used for fastening timber framing, mouldings, flooring, general finishing and cabinet work. For exterior applications galvanised nails should be used. Sizes range from 25 x 1.6mm to 150 x 5.6mm.

Flat head nails are used for fastening thin material such as case timber where the nail head does not have to be punched and filled for appearance, or where the flat head might prevent the nail from pulling through. Sizes range from 30 x 2mm to 100 x 4.5mm. Smaller sizes such as 25 x 1.4mm are often sold as wallboard nails.

Collated nails are used in a finish nailer or bradder for assembly work. Nail lengths usually range from 32mm to 65mm.

Particleboard nails have been designed specially for fastening particleboard. The twisted thread provides more grip in the flaky structure of particleboard than bullet head nails. Usual sizes are 25 x 2.5mm, 40 x 2.8mm and 50 x 2.8mm.

Process nails have a glue coating which melts when the nail is driven. They are used where the added strength of the adhesive is an advantage such as in fastening framing brackets. A common size is 30 x 2.8mm.

Hardboard nails are used to fix high density compressed fibre boards such as masonite, to a frame. The tapered head is designed for ease of entry into the hard surface of the sheet. Usual sizes are 25 x 1.8mm, 25 x 1.6mm and 20 x 1.6mm.

Brads or panel pins are like small bullet head nails and are used for very fine nailing, particularly of thin material such as plywood. Usual sizes are 12 x 1mm, 15 x 1mm, 20 x 1.2mm and 25 x 1.25mm.

Upholstery nails are used for visible fastening of fabrics to the wooden frames of covered furniture; available in a range of colours, usual length 20mm.

V-Nails are used to fasten the mitred corners of picture frames and are punched into the back of the frame across the mitre by a special hand operated tool or a pneumatic machine. Sizes range from 7mm to 15mm.

Escutcheon pins are used to fasten escutcheon plates (keyhole covers) to cabinet doors and drawers. Usual length is 15mm; available in brass as well as other matching finishes for available escutcheon plates.

Veneer pins are like very fine brads, sometimes without heads. They are used to hold pieces of wood veneer in place while inlaying decorative patterns.

Broad crown staples are used by upholsterers for fastening fabrics to the wooden frames of covered furniture. Staples can be applied with either a manual staple gun or a pneumatic tacker. A typical size could be 14mm crown and 9mm legs.

Narrow crown staples are often used in assembly of light frames and furniture components as an alternative to nailing and are applied with an air tacker. The crown is usually 6mm and length ranges from 13mm to 32mm.

The illustration below shows basic nailing where the thinner timber is always fixed to the thicker piece. As a general rule, the nail should penetrate the thicker piece roughly twice the thickness of the piece being fastened.
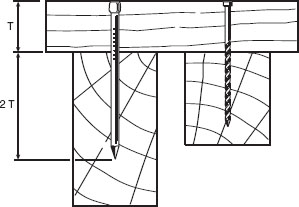
A longer nail should be selected if nailing into end grain. If a shorter nail is necessary, or more holding power is required, a threaded nail could be used.
In cabinet work, nailed joints are always glued. The main function of the nails is simply to hold the joint firmly together until the glue is dry. Most of the joint strength comes from the glue, not the nails.
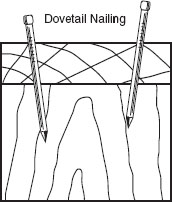
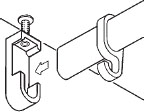
Dovetail nailing, illustrated below, provides greater joint strength than nails which are parallel to the edges of the timber. Because the nails are angled toward each other, they are more difficult to withdraw.
Skew nailing is used where timber thickness or position prevents other methods from being used. The illustration shows how the nails are skewed to the face of the timber.

A nail punch is used to drive the nail after it has been started so the hammer doesn’t mark the face of the timber. Skew nailing is most successful and easiest to accomplish when the joint is clamped firmly together.
Before leaving this page, think of what you've just been reading, and test yourself with these questions.
[[ mm /4 /f ][ Match the type of nail to its general use: ][ Bullet head ~ General purpose use. ][ Collated ~ Used in a finish nailer or bradder. ][ Process ~ Are coated with glue. ][ Hardboard ~ For fixing masonite to a frame. ][ Brads ~ For very fine nailing work. ][ Escutcheon Pins ~ For fixing keyhole covers. ][ Bullet head = general purpose; Collated = finish nailer or bradder; Process = coated with glue; Hardboard = for fixing masonite; Brads = for very fine work; Escutcheon Pins = keyhole covers. ]]
[[ mc /r /f ][ How much of a nail should be driven into the thicker piece of timber? ][ * 1/4 ][ * 1/3 ][ * 1/2 ][ 2/3 ][ * 3/4 ][ 2/3 of the nail shoud be driven through the thinner piece and into the thicker piece.]]
There are many screw types on the market today, from traditional wood screws to a large range of specialty screws manufactured for specific uses. Some of the most common types are illustrated and discussed below.
The choice of head type will usually depend on the application for which the screw is to be used. For example, a countersunk head would be chosen where the screw head is required to be flush with the surface of the material to be fastened.
Countersunk screws are used where a flush finish is required. A countersinking bit is usually used to form the tapered hole (countersink) that the head fits into.

Raised head screws are often used for decorative purposes such as fittings and handles and for fixing sheets with a cup washer.

Round head screws are sometimes used where the material being fixed is too thin to be countersunk.

Pan head screws are commonly used for sheetmetal work. They are usually self tapping screws.

Bugle head screws are generally used for fixing plasterboard to wall studs.

Wafer head screws have a lower profile than round, raised or pan head screws and are used where a less obtrusive finish is required.

Ribbed countersunk screws are often called self-embedding screws because the ribs under the head are designed to cut the required countersink as the screw enters the material. They are most effective when used in soft timber.

The type of slot in the screw head will determine the type of driver to be used. It is very important that a correctly fitting driver tip is used to prevent slipping which can damage both the screw head and the tip of the driver.
Slotted screw heads are the traditional type used on conventional wood screws. The tip of the driver you select for the job should be the thickest that fits all the way into the slot. The width of the driver should roughly equal the diameter of the screw head for maximum purchase or turning power.

Phillips head screws with their cross shaped slot are probably the most common type of screw used today. The driver tip selected should fit snugly into the slot without rotational movement or play.

Square slots are usually found in screws which are manufactured for special purposes such as in knock-down furniture. Square slots provide a very positive drive and minimise slipping.

Hexagonal slots are often used in special purpose screws such as for knock-down furniture, for example large screws that require an allen key as the driver.

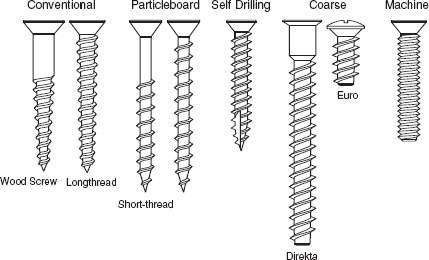
Conventional wood screws are used for fixing to timber. A clearance hole for the shank is drilled to prevent binding.
Longthread screws are fully threaded to give extra holding power. When using long thread screws clamp the joint or drill a clearance hole, otherwise the screw will push the joint apart as the tip begins to penetrate the base piece.
Particleboard screws have a coarser thread than conventional wood screws. The coarser thread reduces stripping of the wood fibres in manufactured boards and improves holding power.
Self drilling screws are often used as general purpose screws when working with softwood because they can often be driven without drilling a clearance or pilot hole.
Coarse thread screws such as the Direkta® and Euro® types illustrated are generally used in knock-down furniture and fittings, particularly in manufactured boards.
Machine screws (metalthreads) have a parallel shank and are used like bolts, either with a nut or in a threaded hole for attaching handles and other hardware fittings.
Generally, the length of the screw should be 2 to 2·5 times the thickness of the material being fastened. For materials over 30mm thick, screw penetration of 30mm into the base material is usually sufficient.
Conventional wood screws require two different sized holes to be drilled to allow full pressure to be applied to the screw and also for ease of turning the screw in the material. The illustration below shows the parts of a wood screw and the holes required.
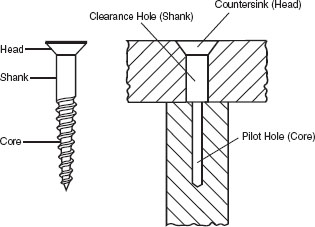
A clearance hole, slightly larger than the shank of the screw is drilled through the material being fastened to prevent binding.
A pilot hole the size of the screw’s core is drilled in the base material allowing the screw to cut its own thread. A special bit is used to cut the countersink so the screw head will finish flush with the surface of the material.
The thread on a wood screw is cut from the shank diameter. However, the threads on most modern screws are rolled, the metal being pushed up to form a thread larger in diameter than the original shank. If short thread screws are used, there is no need to drill a clearance hole. The correct size pilot hole drilled through the top piece of material and into the base piece will suffice.
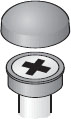
Plastic cover caps are often used to hide screw heads in cabinet carcase construction. They are available in a range of colours to suit wood veneer and other finishes on manufactured boards.
Push on cover caps have a projection which locks into the cross slot of the screw or connector. The screw head must be flush with the surface of the material.
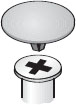
Snap on cover caps are designed to be used with countersunk head screws. The head of the screw is fitted into the countersunk plastic base before the screw is driven home. Be careful not to over-tighten the screw and distort the cap base. The cover cap snaps onto the cap base.
Before leaving this page, think of what you've just been reading, and test yourself with these questions.
[[ mm /5 /f ][ Match each of these screw heads to their most suitable purpose: ][ Countersunk ~ For flush finishes. ][ Raised head ~ For fixing sheets with a cup washer. ][ Round head ~ Used on thinner material. ][ Pan head ~ For sheetmetal work. ][ Bugle head ~ For fixing plasterboard to studs. ][ Wafer head ~ For a less obtrusive finish. ][ Ribbed countersunk ~ Cut their own countersink hole. ][ Countersunk = flush finishes; Raised = with a cup washer; Round = thinner material; Pan = sheetmetal; Bugle = plasterboard; Wafer = less obtrusive; Ribbed countersunk = cut their own countersink hole. ]]
[[ mc /f ][ Do you know what type of slot is typically found in screws used for timber decking? ][ Square drive. ][ * Straight slot. ][ * Philips. ][ * Hex drive. ][ Most decking screws have a square drive slot, to allow for a very positive drive, usually into hardwood. ]]
[[ mc /f ][ How deep should a pilot hole for a screw be drilled? ][ The same as the length of the screw's core. ][ * The same as the screw's total length. ][ * 2/3 of the screw's length. ][ * As deep as possible. ][ The length of the screw's core should dictate the pilot hole depth. ]]
Knock-down fittings allow items of furniture to be assembled and disassembled any number of times. The assembly drawing below shows a cabinet that is constructed from a manufactured board and assembled using a variety of knock-down fittings.
Modifications such as changing the position of the shelf or adding some extra shelves are made simple.
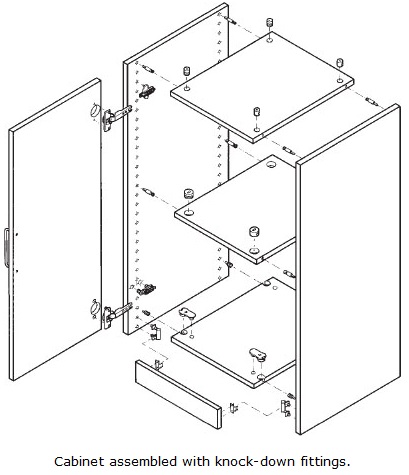
Also transport and storage are simpler and cheaper when the unit is disassembled or knocked down.
Some of these fittings are made for one purpose only. Others are versatile and may have several different applications.
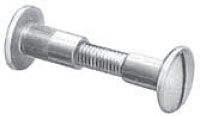
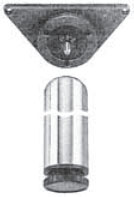
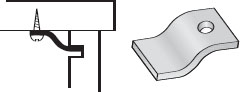
Eccentric connecting fittings consist of two parts; a connecting bolt and a housing or boss, which is drilled and inserted into the horizontal panel. The connector bolt head fits into the housing which contains an eccentric cam surface.
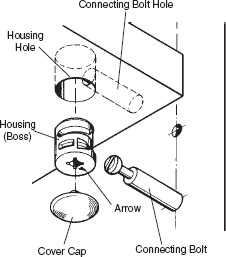
Before assembly the housing should be rotated until the arrow indicates correct alignment with the connecting bolt. After assembly, the housing is rotated with a driver or special key and the cam applies tension to the connecting bolt head, tightening the joint.
Be careful not to overtighten eccentric knockdown fittings or the connecting bolts may become loose in the side panel. A common eccentric connecting fitting used in knockdown furniture is shown on the right.
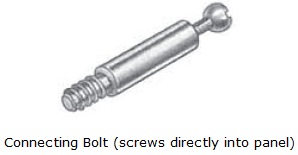
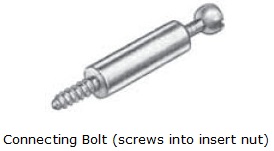
There are many different types of connecting bolts for knock-down fittings, varying in length, diameter and thread type. Some connecting bolts are screwed directly into the panel. Others are screwed into an insert nut. Typical examples are shown below.

The metal cross dowel and threaded bolt combination illustrated on the right can be assembled and knocked down any number of times without damage to the fitting or weakening the joint.
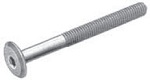
The dowel hole is drilled through the cross member at right angles to its face and the bolt hole is drilled through the side panel and into the edge of the cross member.

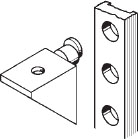
Panel connectors are used for joining individual cabinets together such as in modular kitchens and other applications where carcase components or panels need to be fastened face to face.
 |
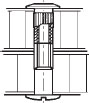 |
The panel connector illustrated consists of a screw and a knurled sleeve. The knurling helps to stop the sleeve from turning as the screw is tightened. The lower illustration shows how the panel connector fastens two panels together.
Before leaving this page, think of what you've just been reading, and test yourself with these questions.
[[ mc /f ][ Why are eccentric connecting fittings so named? ][ The boss contains a joint-tightening cam. ][ * They're very unusual fittings. ][ * They are a screw and a bolt all in one. ][ * They can apply significant tension. ][ The boss contains a cam that tightens the joint when the boss is turned on the bolt head inside the housing hole. ]]
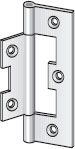
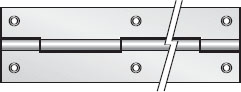
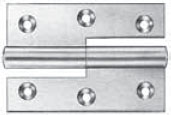
Butt hinges are traditional cabinet door hinges, generally available in steel, brass and chrome finishes. They are used mainly on cabinets where the door is fitted inside the opening, showing only the knuckle of the hinge when the door is shut. The hinge is let into the edge of the door or both the door and the cabinet. Butt hinges open to 180°.
Recessed hinges are used in similar situations to butt hinges, except they are not let into the door or carcase. One leaf of the hinge fits into the recess in the other leaf when the door is closed and the thickness of the hinge provides the door clearance in the opening.
Flap hinges open to 180° and are used where a door or flap opens into a horizontal position. The photograph on the left shows a round leaf flap hinge. Flap hinges are often used with a stay which supports the flap in the open position.
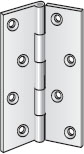
Continuous hinges or piano hinges, are available in lengths usually up to 3500mm. Continuous hinges are screwed along the full length and are used in situations where butt hinges would not provide sufficient strength. As the alternative name suggests a typical use for a continuous hinge is on a piano keyboard cover.
Reflex hinges can be used where an opening angle of more than 180° is required. The extra clearance between the inner edge of the leaf and the knuckle of the hinge allows the reflex action which usually enables the hinge to open to at least 270°.
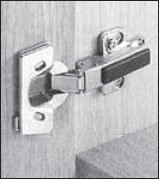
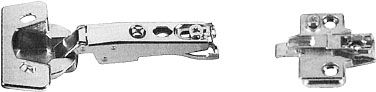
Concealed hinges with mounting plates, as shown below, are the most common cabinet hinges used today. Many different types are available with opening angles usually ranging between 90° and 170°. The mounting plate is fitted to the cabinet and a special large bit is used to drill out the back of the door to take the cup of the hinge.
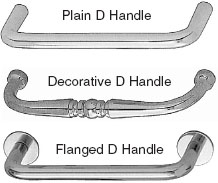
There is a very large and constantly changing range of cupboard handles available today. They are produced by several manufacturers who often use different names for the same type of handle. The selection of handles shown here and the names used are common in the construction Industry.
D handles can be used on cupboard doors and drawers and are usually available in brass and chrome finishes, plastic (various colours) and wood (various species) as shown above.
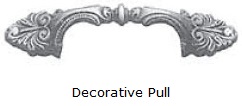
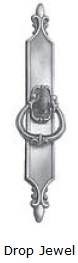
Antique style handles are available in a variety of finishes such as brass, antique brass, bronze and antique bronze. The decorative pull is suitable for use on doors and drawers, while the drop pull is generally used for drawers only.

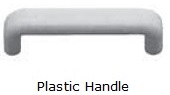
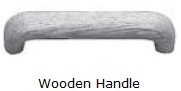
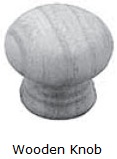
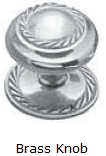
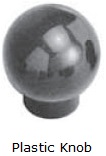
Knobs are available in many shapes and materials. The examples on the right are manufactured from wood, metal and plastic. Knobs can be used on doors as well as drawers.
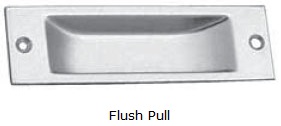
Flush pulls are designed to be used on sliding doors and are let in flush with the surface of the door. The flush pull below left is positioned vertically on the door and secured with screws.
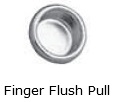
The finger flush pull is secured as a press fit in an accurately drilled hole.
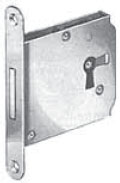
Straight cupboard lock is a trade term that is sometimes used to describe locks which are screwed straight onto the inside of a cupboard door such as the pilaster lock shown below.
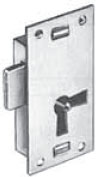
Cut cupboard lock is a trade term that is sometimes used to describe locks which are actually cut into the door, such as the mortice lock shown below.
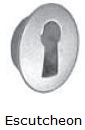
Escutcheons are used to finish keyholes which are cut through a door or drawer front when a lock is fitted. Escutcheon inserts are fitted into the keyhole flush with the face of the door or drawer. Other escutcheons are either press fit or fastened over the keyhole with escutcheon pins.

Most cupboard door catches consist of two separate parts; a striker and a retainer. The striker is usually fitted to the door and the retainer to the inside of the carcase or to the under side of a shelf. A selection of catches commonly used in the construction Industry follows.
Ball catches are available as single ball or twin ball catches. The spring loaded twin ball catch on the right is a heavy duty cabinet door catch. The retaining pressure is adjustable with a screw driver.
Magnetic catches are generally made from plastic with a steel plate attached to the striker and a rigid magnet attached to the retainer.
Roller catches, as shown below, are general purpose spring loaded metal catches which feature nylon rollers and elongated screw holes for adjustment.

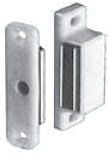
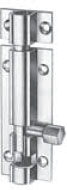
Barrel bolts are fitted to the inside face of a cabinet door when securing points are required at the top and/or bottom or for securing the non-locking door in a pair of doors.
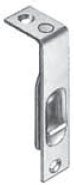
Flush bolts are used for the same purpose as barrel bolts. They are let into the edge of the door at the top and/or bottom corners.
In furniture design a lid is a hinged panel that is lifted to open and a flap is a hinged panel that is lowered to open. Stays or limit arms are often used to support flaps and lids.
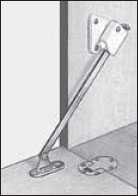
The flap stay illustrated below has a friction brake that is adjusted with a screw to allow the flap to lower gently to its open position.
Pivoted stays are also used on flaps. They fold at the pivot when the flap is closed. Some need to be lifted at the pivot when closing.
Several other types of furniture stays are available including lid stays, gas stays and spring stays.
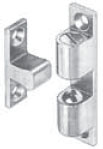
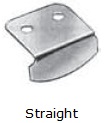
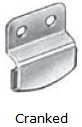
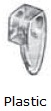
There are many different types of shelf supports available for a wide range of applications. Three of the common types of shelf supports are shown in the illustrations below.
Plug in shelf supports are mounted directly into 5mm or 6mm holes drilled in the carcase. The types shown are usually made from plastic.
Sleeve mounted shelf supports fit firmly into a steel or brass sleeve. The sleeve is a press fit, usually into a 7.5mm hole drilled into the carcase.
Strip mounted shelf supports fit into holes or slots in plastic or aluminium strips which are knocked into grooves cut in the carcase.
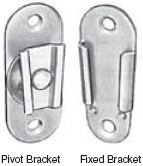
Revolving mirror fittings consist of a pivot bracket with tapered flanges, which is screwed to the mirror frame and drops into a fixed bracket with tapered guides that is screwed to the mirror frame support.
 |
 |
 |
 |
Frameless mirror clips hold the mirror onto a panel or directly onto a wall. The metal clips are usually supplied with an attached rubber pad to protect the mirror. Plastic clips are usually made from clear material.
Semi-concealed mirror clips are also used for frameless mirrors. They are fitted behind the mirror, revealing only the mirror retainer.
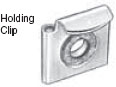
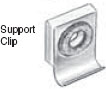
The support clip holds the weight of the mirror and the spring loaded holding clip secures the top of the mirror. Attached circular rubber pads provide a cushion for the mirror.
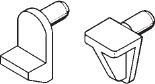
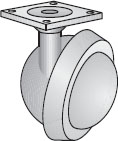
Ball type castors, as illustrated below are spherical in shape and are generally used for light duty applications.
Dual wheel castors are usually made from plastic materials with a satin or matt black finish.
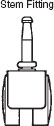
Plate fitting castors are attached with screws. Stem fitting castors lock into a metal or plastic socket which is inserted in the item of furniture.

Mechanical drawer runners provide smooth operation of the drawer and usually maintenance free long life.
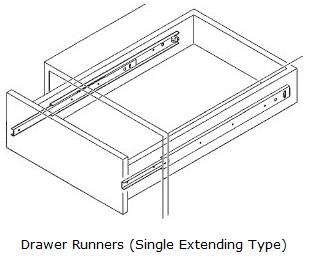
Single extending drawer runners do not extend the full depth of the drawer.
Fully extending drawer runners have an extra telescopic extension which allows the drawer to extend for its full depth.
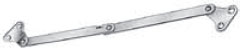
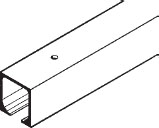
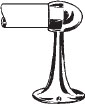
The fittings illustrated are generally used on sliding wardrobe doors.
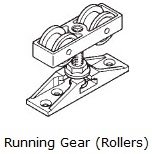
The track is usually made from a light aluminium alloy and is screwed to the head of the door opening.
The running gear consists of a set of rollers which run in the track and a plate which is screwed to the top of the sliding door. The adjustment nut is used to level the door and ensure a proper fit in the opening.
The guide is screwed to the bottom of the door opening and fits into a groove which is cut in the bottom of the sliding door.

The stop is positioned in the track so the roller housing on the running gear comes into contact with the rubber buffer where the door is to stop. The extending steel spring clips over the roller housing and retains the door in the closed position.

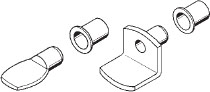
The hanging rod supports illustrated are generally manufactured to suit 19mm diameter stainless steel or chrome plated tube.
End brackets are screwed to the sides, inside a wardrobe to support the hanging rail.

End pillar supports are screwed to the under side of the wardrobe top. One disadvantage of end pillars is that all the weight is on the screw threads.
Centre pillars are used to support long hanging rods and can be used with end brackets or end pillars.
The oval rail and support system shown on the right comes complete with hooks or hangers. They are usually made from chrome plated steel or brass with plastic hooks.
Leg mounting plates are used to attach demountable legs to office and domestic furniture such as tables and small desks. The top of the leg screws onto a bolt which is moulded into the leg mounting plate.
T nuts are multi-purpose connectors which can be used in a variety of applications including knock-down furniture. The type illustrated below has four teeth which are driven into the timber to stop the nut from turning when the bolt is tightened.
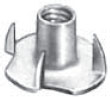
The T nut should always be used in a position that causes the nut to be pulled into the timber when the bolt is tightened. A common use for T nuts is fastening upholstered seats to metal framed chairs and stools.
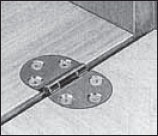
Table clips are used to attach solid timber tops to tables and other items of furniture. A groove is cut in the inside faces of the table rails to take the table clips as shown in the illustration below.
A solid timber top, say 1000mm wide will move (shrink and swell) in its width, with changes in humidity over time. If the top is fixed rigidly the timber cannot move. This could cause joints to open up or the timber could split. Table clips move in the groove as the solid timber top moves.
Before leaving this page, think of what you've just been reading, and test yourself with these questions.
[[ mm /f ][ Match each type of hinge with an appropriate description: ][ Butt Hinge ~ Traditional cabinet door hinge. ][ Recessed Hinge ~ One leaf fits inside the other. ][ Flap hinge ~ Used where a door opens to a horizontal position. ][ Piano Hinge ~ Continuous strip of hinge. ][ Reflex Hinge ~ An opening angle of more than 180°. ][ Concealed Hinge ~ Most common cabinet hinge today. ][ Butt = traditional hinge; Recessed = one leaf fits inside the other; Flap = door opens to horizontal position; Piano = continuous strip; Reflex = opening more than 180°; Concealed = most common. ]]
Some of the more common adhesives used in the construction Industry are discussed below. You should have a good understanding of their properties so you can choose the right one for the job you are doing. When you are using any adhesive the surfaces to be bonded should be free from moisture, dust, dirt and grease and the assembled parts should form a good fit.
PVA is a white, ready to use glue produced by reacting acetylene with acetic acid. Standard PVA is not waterproof but does resist fungi and bacteria. It has good gap filling qualities, is non-staining and not flammable. PVA is the most common general purpose glue used for woodworking but it will not bond a non-porous surface such as metal to wood. Working time is about ten minutes and minimum cramping time is usually two or three hours. Longer periods may be necessary in cold or damp weather.
Contact glue is a synthetic rubber based adhesive. It is mostly used to bond plastic laminate to manufactured boards, such as in bench tops. Adhesive is applied to both surfaces with a notched spreader (or sprayed in an industrial situation) and allowed to become touch dry which usually takes ten to twenty minutes. The surfaces are brought together and the bond is immediate.
No cramping is necessary but even pressure should be applied by rubbing, rolling or using a block of wood and hammer. Contact glue is flammable, highly toxic and gives off very pungent fumes. It should be kept well away from all sources of heat and should be used in well ventilated areas where possible, otherwise respiratory protection should be worn. Contact with the skin should also be avoided.
Epoxy resin is a two part glue consisting of resin and a hardener or catalyst. When mixed with the hardener, epoxy resin adhesives allow assembly time of up to an hour at approximately 20°C and require a holding time or cramping time of up to twenty-four hours or more. There are quick-setting epoxy resin adhesives on the market that will begin to set in a few minutes.
Epoxy resin adhesives are waterproof and very strong. They will bond wood to wood, metal to metal, rubber and glass to metal and so on. Epoxy resins are chemical adhesives and should be handled and used with care. Good ventilation is essential and contact with the skin should be avoided.
Formaldehyde adhesives are thermo-setting resins which are hardened by the addition of a catalyst. The setting action is caused by chemical change which can be accelerated by increasing temperature. Formaldehyde adhesives cannot be softened by heat once they are set.
Urea formaldehyde is widely used in industry for assembly gluing, and the manufacture of plywood, MDF and particleboard. It requires a cramping time of two to twenty-four hours at room temperature or several minutes at 90° to 120°C. Where very long assembly times are required, resin can be applied to one surface and hardener to the other. Melamine and resorcinol formaldehydes would be used where a waterproof glue is required.
These are chemical adhesives and should be handled and used with care. Good ventilation or respiratory protection is essential and contact with the skin should be avoided. Where heat is used in the curing process, care must be taken to avoid coming into contact with the hot work or equipment.
Before leaving this page, think of what you've just been reading, and test yourself with these questions.
[[ mm /f ][ Match each type of adhesive with the appropriate description: ][ PVA ~ General purpose; reacts acetylene with acetic acid. ][ Contact Glue ~ Flammable, highly toxic; synthetic rubber based. ][ Epoxy Resin ~ Waterproof, very strong; resin plus hardener or catalyst. ][ Formaldehyde Adhesive ~ Thermo-setting resins; used in particleboard. ][ PVA = general purpose; Contact Glue = flammable, highly toxic; Epoxy Resin = resin plus hardener; Formaldehyde Adhesive = thermo-setting resin. ]]
Some of the common finishing materials used in the construction Industry are discussed below. Preparation is basically the same for all wood finishing materials. The surface to be finished should be free from dust, dirt, oil or grease and should be properly sanded.
Shellac is used for traditional French polishing. It is a natural resin which is secreted by insects called lac beetles. The polish is made by dissolving shellac in methylated spirits. French polish is applied by rubbing the polish into the grain of the timber with a polishing pad or ‘rubber’ and building up the body of the coating. French polish is not waterproof and resists abrasion only moderately well and is easily damaged by substances such as chemicals and solvents.
Nitro-cellulose lacquer generally needs to be thinned with the recommended thinner for brushing or spraying. It dries in a few minutes and is ready to coat again in about two hours. Lacquer is generally sprayed and sometimes finished with a ‘pulling rubber’ (cotton wadding in a chamois) to smooth the surface. Lacquers generally have moderately high resistance to abrasion, spirits and water.
Pre-catalysed lacquers are based on thermosetting resins which cure or harden with a catalyst. The catalyst is pre-mixed with the resins, solvents and other compounds at the time of manufacture. The catalyst reacts with the resins only when the volatile solvents begin to evaporate after application.
Pre-catalysed finishes such as polyurethane can be sprayed, brushed or rolled, usually drying in three or four hours with twenty-four hours between coats. Light sanding is necessary between coats and a fine finish can be achieved with a rubbing compound and polish if required. These finishes are highly resistant to abrasion and are chemical resistant.
Some lacquers can also be rubbed back with very fine wet and dry abrasive paper or steel wool, then finished with a cutting (or rubbing) compound and polish.
Two-pack polyurethane consists of two sets of compounds, one containing the resins and the other containing the catalyst. Chemical reaction commences as soon as the two parts are thoroughly mixed. The mixture should be left for a few minutes according to the manufacturer’s specifications before spraying, brushing or rolling.
The manufacturer’s specified time between coats should be followed so that both chemical and mechanical adhesion occurs between successive coats. Two-pack polyurethane can be finished in the same manner as the pre-catalysed type but dries to a much harder and more durable finish.
Oil finishes give a soft, dull lustre to timber. Traditionally, natural oils such as linseed oil were rubbed into the surface of the wood. This is a simple wood finish but is very time consuming. Modern finishes such as Scandinavian oil are generally applied in two stages. A sealer coat is applied in the first stage. When the sealer is properly dry the surface should be lightly sanded. The oil is then applied and, while still wet, rubbed into the surface using a fine steel-wool pad, working with the grain.
Excess oil should be wiped off and the process repeated after the first coat is properly dry. Scandinavian oil produces a reasonably durable, open grain, satin smooth finish which can easily be revived by rubbing in another oil coat.
Enamels are manufactured by adding pigments to the resins, solvents and other materials that make up the liquid body of this finishing material. Those that can be brushed or rolled are usually thinned with mineral turpentine, but special spraying enamel which dries by chemical reaction, usually requires a special thinner. Enamels provide a reasonably hard and durable surface, usually available in a range of finishes such as gloss, semi-gloss and matt.
Acrylics are versatile finishing materials which include water based wall paints that are very easy to use. They dry quickly and are usually available in semi-gloss, satin and matt finishes. Brushes and rollers wash out with water. Spraying acrylics consist of acrylic compounds, volatile solvents, pigments and other materials which dry chemically to a very durable finish. A special solvent is usually required for thinning and clean-up.
Furniture finishes can range in appearance from a deep shiny glass-like look, to a dull surface which reflects very little light. Manufacturers often use different terms to describe the finish of their product, for example, full gloss or high gloss, low sheen or satin, matt or flat. Modern finishing materials are chemically engineered so that they dry to the type of finish stated on the label.
High gloss refers to the glass-like finish that can be achieved by building up a considerable depth of material through the application of numerous coats and finishing to the manufacturer’s recommendations.
Gloss finishes with modern finishing materials may not require as many coats as a high gloss finish. A gloss finish has a shiny surface but doesn’t have the deep glass-like appearance of a high gloss finish.
Satin finishes have an attractive soft lustre that reflects less light than a gloss finish. Because of this, it is often argued that a satin furniture finish shows the natural beauty of the timber to better effect than the glossier finishes.
Matt finishes are quite dull and are not often used as a high quality clear furniture finish. A matt furniture finish is more likely to be produced with some pigmented enamel finishing materials.
Before leaving this page, think of what you've just been reading, and test yourself with these questions.
[[ mc /f ][ Which of these coatings are water based? ][ * Shellac. ][ * Lacquer. ][ * Polyurethane. ][ * Oil Finish. ][ * Enamel. ][ Acrylic. ][ Acrylic coatings include water-based paints. ]]
[[ so /f ][ Place these finishes in order of "shiny-ness" ][ Flat. ][ Matt. ][ Satin. ][ Gloss. ][ High Gloss. ][ Flat => Matt => Satin => Gloss => High Gloss. ]]
Manufactured furniture is often constructed from cheap timber and stained to look like more expensive varieties. Stains are also used to improve uniformity of timber colour in a furniture piece before applying finishing materials.
The colour and intensity of stain should always be tested on a similar piece of timber before application. Stain should be applied to the bare wood with a brush and excess stain wiped off with a soft cloth in the direction of the grain.
Oil stains consist of oil-soluble dyes dissolved in oils such as turpentine. They are easy to apply but may tend to fade over time.
Water stains contain water soluble dyes. They penetrate the wood fibres very well and are reasonably fade resistant. Water stains can raise the grain of the timber when applied. Small wood fibres stiffen and cause roughness on the timber surface. This can be avoided by wiping over the surface with a wet cloth, allowing it to dry and sanding before applying the stain.
Spirit stains consist of dyes dissolved in methylated spirits or alcohol. They work well on open grained timber but are not generally suitable for very close grained timbers. They do not penetrate as well as water stains and are less fade resistant.
Ready to use stains are available in the colours of commonly used cabinet timbers such as maple, cedar, mahogany, etc. Stains can be lightened in colour by breaking down with the appropriate solvent.
Liming gives the appearance of weathered whitewash. Liming compounds are usually available in light shades of colours such as grey, blue or green. Liming works best on open grained timbers such as Tasmanian Oak.
The liming material is rubbed into the grain. Excess is wiped off exposing the character of the timber. When dry, the surface would be coated with a clear finish.
Before leaving this page, think of what you've just been reading, and test yourself with these questions.
[[ mc /f ][ Which type of stain usually contains mineral turps as a solvent? ][ Oil Stains ][ * Water Stains ][ * Spirit Stains ][ * Limed Finishes ][ Oil stains use turpentine as a solvent. ]]
Wood grain fillers are used to fill the pores of open grained or textured timbers to provide a smoother surface on which to build up coats of the finishing material. When the pores are filled, the desired finish can be achieved by using a smaller quantity of the finishing material.
Grain filler is usually applied by rubbing it into the grain with a hessian pad after firstly applying a coat of clear sealer to the timber. Excess is carefully wiped off with a cloth, leaving the filler in the pores.
Linseed oil based fillers can be made by mixing whiting and linseed oil with a drier such as terebene and thinning to a paste with a solvent such as turpentine. Colouring agents are added to suit the timber to be filled.
Ready to use fillers are available in a range of popular timber colours as well as neutral (light greyish colour) and transparent.
Plaster fillers are made by combining plaster of Paris with powdered pigment colours matched to the colour of the timber to be filled. The dry filler is rubbed into the grain with a damp rag which moistens the compound allowing it to set.
Staining filler is similar to an ordinary filler in the form of paste, except that it has a greater proportion of colouring pigments. It is applied in a similar manner to other fillers but it will stain and fill in one operation.
Before leaving this page, think of what you've just been reading, and test yourself with these questions.
[[ mc /f ][ Which of these fillers usually contains terebene as a drying agent? ][ Oil-based Filler. ][ * Plaster Filler. ][ * Composite Filler. ][ * Ready-to-Use Filler. ][ Linseed oil based filler usually has terebene as a drying agent. ]]
Stoppings are putty type materials that are used to fill holes, surface cracks and other minor imperfections in the timber.
Wax stoppings were traditionally made from a mixture of beeswax and crushed resin melted together with shellac flakes. The wax stoppings available today are usually made from synthetic waxes and come in the usual range of wood colours.
Wax stoppings can be heat softened if necessary and pushed into the hole. Excess can be pared off with a sharp chisel. They can be coated with finishing material immediately.
Ready to use stoppings are made from fairly quick drying plastic materials. They are generally sold in tubes and are available in a range of wood colours. Ready to use stoppings are usually in the form of a thick paste. This allows the holes to be slightly over-filled to allow for some shrinkage of the stopping as it dries. Excess can be sanded off when properly dry.
[[ sh /n ][ Manufactured Boards & Sheets ]]Manufactured sheet materials such as particleboard, medium density fibreboard, plywood, hardboard and plastic laminates are used extensively in the construction Industry.
Particleboard is made from the thinnings and trimmings from pine plantations as well as plantation trees. The wood stock is milled into coarse and fine flakes which are dried and sprayed with a resin adhesive such as urea formaldehyde.
The flakes are then formed into mats with coarse flakes sandwiched between fine flakes. A number of these mats are placed in a hot press where they are compressed.
The high temperature of the press cures the resin adhesive forming strong, grainless sheets which are chemically treated to prevent attack by termites and borers. The particleboard sheets are sanded to accurate thickness and cut to the required size.
Medium density fibreboard or MDF, is manufactured using basically the same process as particleboard. The main difference is that in manufacturing MDF, the particles are pulped to separate the wood fibres which interlock to create the sheet strength. This fine fibrous texture is fairly uniform throughout the sheet.
Particleboard and medium density fibreboard are used in cabinet construction for shelving, doors, drawers, tops, gables, bases and partitions. They are available as plain sanded sheets or veneered in a range of cabinet timbers.
Manufactured boards are also available with melamine surfaces, either plain white or with a pattern such as wood grain. Plain white is usually used for the interiors of cabinets and patterned sheets for the exterior parts such as doors and drawer fronts.
Both particleboard and medium density fibreboard require edge treatment when used in cabinet construction. Self adhesive and iron-on edge veneers are available to match the sheet finish or, alternatively, timber edge strips could be used. When gluing sheet edges, a second application of glue is usually required because the porous edges absorb the glue.
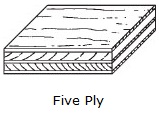
Plywood is manufactured by laminating an odd number of thin sheets of timber, or veneers, which usually range in thickness from 0.8mm to 3.2 mm. The veneers (or plies) are arranged with the grain direction at right angles in the alternate layers.
The odd numbered veneers are usually placed with the grain running along the length of the sheet.
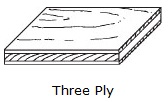
The even numbered or cross bonded layers are thicker than the others and have the grain running across the width of the sheet. In the manufacturing process, the veneers are hot-pressed using resin adhesives. The type of resin used will depend on the end use of the product.
For example, marine or external grade plywood would be bonded with a waterproof adhesive such as phenol formaldehyde. Internal grade plywood might be bonded with an adhesive that is not as moisture resistant such as urea formaldehyde.
Cross grain bonding produces a very strong product with its strength evenly distributed over the whole sheet and also minimises the effect of shrinkage.
Standard plywood can be used for cupboard backs and drawer bottoms. Plywood veneered with fancy cabinet timbers could be used for door panels, cabinet tops or other furniture components or panels that are to have a polished finish.
Hardboard sheets have limited application in the furniture industry. The main use is as an alternative to thin sheets of particle board or medium density fibre board for cupboard backs and drawer bottoms.
Australian hardboard is manufactured from hardwood chips, mainly eucalypt, pulped with water and then spread as a mat on a moving wire mesh screen. The mats are compressed at high pressure in presses which are heated to about 240°C, forming tough, dense, grainless sheets.
After pressing, the sheets are treated in humidifying ovens to stabilise the moisture content at 5% to 8%. Sheets are then sanded and trimmed to required dimensions.
Plastic laminates used in the furniture and joinery industries are usually bonded to particle board or fibre board to provide a hard wearing, decorative surface for cabinet tops, doors, gables etc. Sheets are usually 0·8mm or 1·3mm in thickness and readily available in sizes up to 3600mm x 1200mm with a wide variety of patterns, colours and wood grains.
Plastic laminates consist basically of three layers; the base layer which is, in itself, layers of plasticised paper, the pattern layer and the surface layer of clear melamine. The clear layer of tough melamine provides a durable surface that protects and highlights the pattern layer.
The base layer is the thickest of the three layers and the least expensive of the materials used. Laminated plastics are usually bonded to the base board with contact glue and edge finishing can be carried out within a few minutes.
Plastic laminates are quite hard and will quickly damage cutting edges. Tungsten tipped cutting tools are most suitable for edge finishing while files and abrasive paper can be used for fine edge finishing work.
Before leaving this page, think of what you've just been reading, and test yourself with these questions.
[[ mm /f ][ Match each type of board to how it is manufactured: ][ Particleboard ~ Made of compressed fine and coarse flakes. ][ MDF ~ Made of finely pulped pine fibres. ][ Plywood ~ Made of timber veneers at 90° to each other. ][ Hardboard ~ Made from pulped hardwood chips. ][ Laminated Plastics ~ Are usually bonded to fibreboard or particleboard. ][ Particleboard is made of compressed flakes; MDF is made of pulped pine fibres; Plywood is made of timber veneers; Hardboard is made from hardwood chips; Laminated Plastics are bonded to particleboard. ]]
[[ mm /f ][ Match each type of board to a typical application: ][ Particleboard ~ Laminated cabinetwork. ][ Plywood ~ Wind bracing of house frames. ][ Hardboard ~ Cabinet backing. ][ Laminated Plastics ~ Cabinet tops. ][ Particleboard = laminated cabinetwork; Plywood = bracing house frames; Hardboard = cabinet backing; Plastics = cabinet tops. ]]